Monday, 22 August 2011

Storyboard for Robot Arm

Below is the thumbnail storyboard I made for my Robot Arm. It is for a longer version than the one I made as Said said that we can ditch the 100 frame rule and have freedom to express ourselves! Love it!

Thursday, 18 August 2011

Robot Arm Blocking Assignment

This is one of the assignments I've been really looking forward to but I hate that were only meant to do 100 frames (a little over 4 seconds)! The assignment is to make the arm turn around, pick up the can and turn back around and set it down but 4 seconds isn't long to do all that and to add real character to it, still I gave it a go.

This week we are just meant to be blocking our animation so at least I can come up with the idea with plenty of time. Click here for a definition of BLOCKING. Below is what I have come up with so far. The Robot Arm is meant to be surprised by the can bumping into him so I wanted the quickness really to show that.

Wednesday, 17 August 2011

Fixed the ball

I fixed my ball. I noticed that the ball was stretching too early and that the bounces were like it was heading into wind so I checked the graph editor and i had forgotten to make the stretches ease in and out so I did that and noticed a missing stretch so fixed that too. I then changed the bounces in the graph editor too so now I think its lots better. Below is my 1 ball bouncing from a side view and below that is with a copy of it imported into the original but at a different angle so you can see both balls.


Please comment if you notice anything I have missed.


Some comments from my classmates

Charlie - Nice job Emma! Couple things that I noticed:

1. Turn off the grid for your playblasts, it'll make things easier to see.
2. Zoom the image in more. Don't forget you can Alt, L, M, and R buttons to make it fit better. You want to be as close to the action as possible to see it clearly.
3. For now I'd take out the stretch and squash and get comfortable with your timing and spacing. Remember each bounce the ground is taking away some of the energy from the bounce so it shouldn't keep bouncing full force.
4. The ball speeds up pretty fast then suddenly slows down as its traveling across the screen. It should gradually get slower along the way.
5. Each subsequent bounce should be around 70% less than the previous one give or take. Bow your curves out on the graph editor and break your tangents for more control.

Love how you thought outside the box by having the ball bounce down the steps, nice thinking! Good luck!

Marcelo - Nice!
Just watch out ball skidding on frame 94.


Said also did this drawing on top of someones work to explain how a ball should bounce. I thought I'd post it as it will be helpful for people who read this blog and myself in the future.

Tuesday, 16 August 2011

2nd attempt at the stairs

Well, here is my second attempt. I think its still slightly not right but Said did say that we don't need to do squash and stretch yet so I think I will just import the second ball tomorrow and move onto the Robot Arm! I've been looking forward to animating that any way :D

Ball Bouncing Down Stairs & Critique

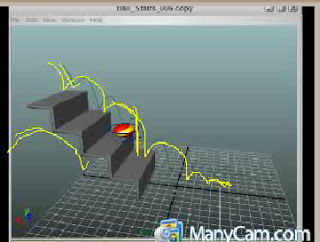
I decided that I would make my bouncing ball more interesting so I animated it bouncing down some stairs. You can see it below.


I knew somethings weren't right about it but as I ran out of time I still showed what I had done to Said during todays Q&A and he had some points about what I did wrong.

Firstly a ball goes into a bounce quicker than it comes out so I need to move my first stretch of a bounce back a frame and not stretch the ball so much on the bounce out. I had thought that might be one of the problems but as my Q&A was starting I needed to upload what I had. Its good to have my suspicion confirmed too :)

Secondly, my bounces are too sharp. Said drew on my animation to explain what it should be like (See left), this was another thing I had noticed and was planning on changing. I'm thinking of missing a step too as it's unusual for a bouncy ball to hit each step. It speeds up a bit and goes further before it slowly bounces to a stop. Even Said in his drawing suggested this.

Thirdly was the view. Although I had planned on doing what Said had said but as I was uploading it quickly so just used the view I was in. Said said that Mentors can get annoyed when a ball just starts from the sky and doesn't roll to a stop or just go off screen. So I need to change it so its looking at the stairs sideways on, put the ball so it starts off frame and make it roll to a stop or roll off screen. Also, change the stretches and jump spacing.

Another point Said made was PLANNING! We were told that we must plan animations before we do them. Which, yes I know... if I had planned out my animation using thumbnail sketches I would of realised that the spacing was off and also the ball stretches so I have learned my lesson to not try and cut corners by not planning. Its actually going to take me longer to fix my mistakes than it would of taken me to of planned it first.

Graph Editor & Bouncing Balls

So we are in Week 8 and this week the is again 2 assignments. The first is to make a ball bounce and to do this I had to use the graph editor a lot. I did at first use the ball rig we were given but for some reason the was no squash or scale controls in the channel box so I started again but this time I used a ball rig I had gotten from the online Escape Studios course I did as it has squash controls. It is quite a lot different to the AM rig as I find it easier to control as Escape put handy control handles on the ball. You can see the difference in the image below.


Any way, after we had one ball bouncing, we had to save it as another name and then import one of the ball bounce files into the other so I then had a second ball doing exactly the same thing. But the second ball needed to bounce a little different than the first so I had to change it. This class really taught me a lot about the graph editor and what it does although I had learned it before it was good to have a refresher and to find out a few new things.

What my graph editor looks like after one bounce (with Translate X & Y selected)

The reason the is a tiny bump in the middle is because I was taught in my Escape course that it is better to make your ball be forced to touch the floor on the frame before it lands so in this case it landed on frame 10 so I forced it to the floor on frame 9 by key framing the Translate X & Y to 0 but with the stretch still on but then still squashes on frame 10. It did mess up the path but I fixed this by using the graph editor and making it look like it does above. This just makes it easier to read the squash on the floor. As you can see in my video below.


What my graph editor looks like after four bounces (with Squash Bottom selected)

What my graph editor looks like after four bounces (with Squash Top selected)


And here is what my four bounces looks like.

Kittywood Studios

A fellow AM student posted this and I had to share it. For anyone who knows me they will know I love cats and this video mixes studio life with cats! It made me smile and laugh so much. So even though this isn't relevant to my course or anything I thought you would all enjoy it.

Tuesday, 9 August 2011

1st assignment where I get to animate!

Wooo! I've been really looking forward to starting an animation assignment and here it is this week :D Although it is very simple. The first assignment is to just move a ball around to show you can use keyframes and do playblast's. I've done this just quickly but I might have a play with it and make it more fun. Maybe, create a Quidditch pitch and have the ball as a bludger that flies around and scores a goal. Any way, here is my first attempt at this assignment. I know its not right but as I said I will have a play later to make it better.


Our second assignment is to create an animation of a ball moving in a circular motion using the ball model we were provided and to remember to select and set keys on the Control Curves in the graph editor ONLY! Below is what I did. I put a circle curve in front of it to show it does do a circle.

Harry Potter Spike

I just read this months Animation Mentor newsletter and at the top the is this Harry Potter Spike. I had to share it as it made me smile. I am a big fan of Harry Potter though, wish I had gotten the chance to of worked on one of the films.

To view this months newsletter go to click here!

The is an interesting article called Animation Around The World: Part 2, I enjoy reading about graduates of Animation Mentor and animators in the industry and how they got to where they are. I like to hear how people travelled the world working for different companies and to think how one day I will be telling similar stories and seeing loads of countries and companies over my lifetime.

Principles of Traditional Animation applied to 3D Computer Animation by John Lasseter

I came across this paper by John Lasseter, which describes the basic principles of traditional 2D hand drawn animation and their application to 3D computer animation. After describing how these principles evolved, the individual principles are detailed addressing their meanings in 2D hand drawn animation and their application to 3D computer animation. This should demonstrate the importance of these principles to quality 3D computer animation.

www.stevepaul.com/John%20Lasseter%20Animation%20Principles.html

Monday, 8 August 2011

Shading and Lighting Assignment

Our next assignment was to add shading.ie. colour, which as you know I did last week. Looks like I took my assignment to the next level last week by accident but meant I had less to do this week. I did put the room into a box and gave it windows and a door hole. I also fixed the 180 degree rule I broke but I am still having a problem where the eyes are just white, will check with Said as to why that is but at least the Mental Ray fixed the crazy pink head problem.

The other half of the assignment was lighting. I've never been very good at lighting so I found this hard. I can make lights and I know which type of light is best for representing a certain thing. Such as Point Lights as lightbulbs or Directional Lights as the sun. I put 2 Directional Lights outside the windows to be the sun shining through and a Point Light for the ceiling light.


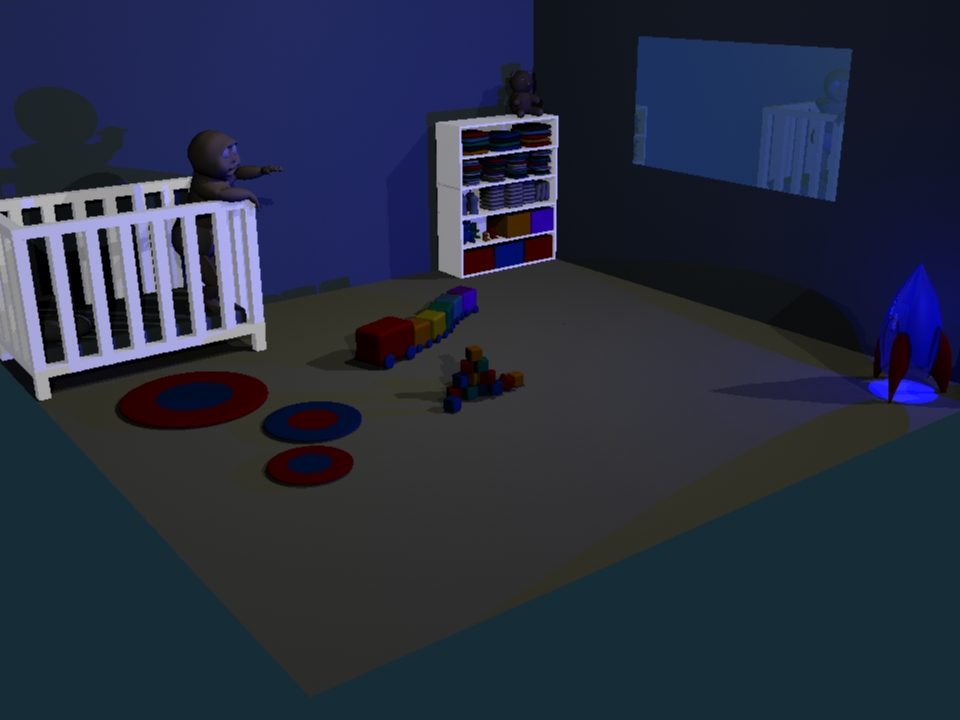
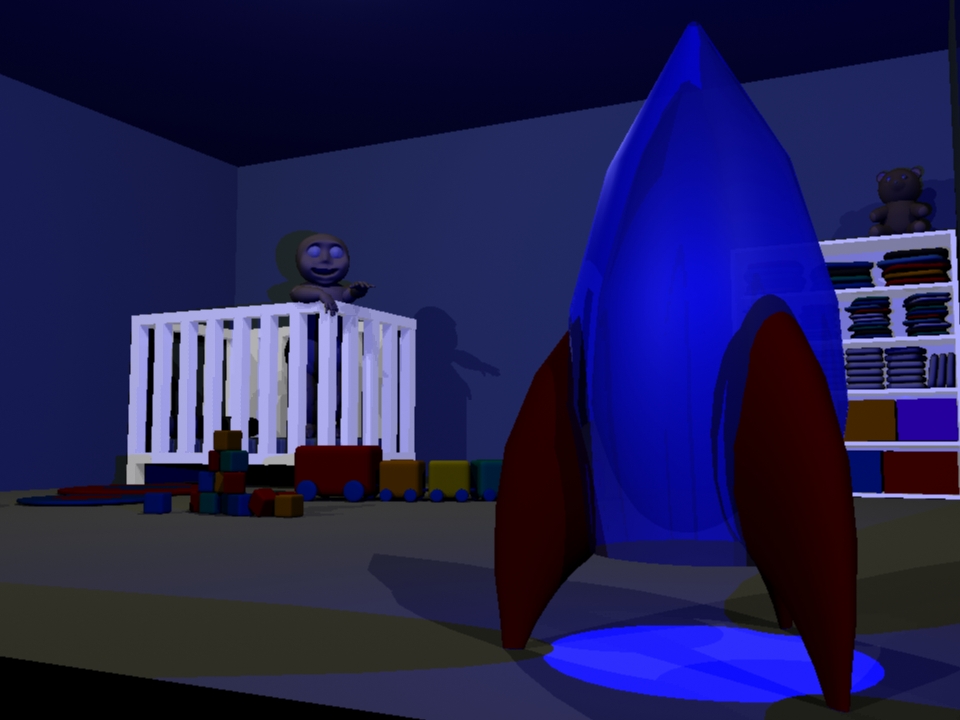
I also made a Rocket shape floor lamp and put a blue Point Light inside it. I thought it would give a bit of interest to the scene. Just for fun I made it dark in the room with just the rocket light too. Oh and you will notice I re-positioned the baby. I just imagined it in the crib trying to reach for the rocket.


Said also kindly used me as an example to show how different light will effect a person as I was sat in my mums kitchen the was a window behind me and the door to the garden was open on my right so me on webcam was a good example. I just had to stay very still as he drew on me to explain what he meant. He then got a bit carried away and gave me a moustache and glasses. As you can see below.

Frame-by-Frame Blog

I came across a really good blog today, which shows clips from animation along with frame-by-frame shots of it so you can see how it was animated. I am sure it will become very helpful but at the meantime it is interesting to look at and make some notes about.

framexframe.tumblr.com

Tuesday, 2 August 2011

Critique for 2nd assignment

Well it wasn't bad. Said (my mentor) liked my scene and said the colours were good and appropriate for a child but as it's an indoors scene I should put the scene in a box. He and my classmates seemed to like that I rigged the bear too. I did that just for a bit of fun as I thought the bear could be posed in silly positions or the baby could move it easily.

I asked about the problems that occurred when I rendered and Said said it was because I was using Maya's rendering tools and I should use Mental Ray so I will be trying that. The only thing he said I need to change is the cameras because I broke the 180 degree rule. Something I have never come across before. Below is a good video that I found that explains what it is.


Monday, 1 August 2011

What I came up with

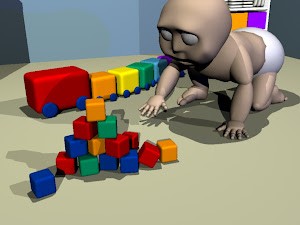
Well, here it is. No idea why I decided to go with a baby or even where the idea came from. I really enjoyed the challenge though and especially the making of his room and all the toys. Oh and if your wondering the coloured stacked things are meant to be clothes.

I didn't have many problems but one I do have is that when I render and image of my scene my babies head goes strange colours. Also, for some reason all the objects I smoothed become un-smoothed when I render. I'm planning on asking what has happened to cause these problems in my lesson tomorrow. I would like to fix it. Here is a rendered image that shows what happens.

Please comment and let me know what you think of my baby and my scene. Remember it was my first go at modelling a person in Maya though :p


Friday, 29 July 2011

How is my assignment going?

Very slowly is the answer to that. I was ill for a few days (really pale, weak, dizzy and nausea) not fun and made it hard to focus on a screen and remember things. Think I watched the videos like 5 times then decided to wait till my illness had passed. I am better now and have got on the way but I sadly don't think my character will be as good as I had originally planned, I'm still not happy with it. He is very basic and I'd prefer he had more... personality... originality. I am considering shrinking him down and making him a little boy instead. I think that might be more fun.

If I am going with the boy idea I was going to make a basic toy or bicycle and make a similar scene to the reservoir down the road. I've tried making some trees, they are pretty basic too though. Any way, you will see what I come up with by Monday :) If you have any comments on it then please let me know and I will play with it more... even if the assignment is finished. I like to make things right :D

Taking Notes

I've been taking notes to record everything we are being taught but I've realised how long it takes me as I am writing in so much detail, 24 A5 pages for 3 lessons... bit much. Funnily enough in my last Q&A with my Mentor I was caught out taking notes. I was just writing away writing what he had just said when I heard my name so I looked up and I had been put on cam. Made me jump and everyone laugh though. For those that don't know; whoever is taking the lesson, coffee talk or Q&A can turn your webcam on and show you to everyone in the session. One of the reasons the is a rule that you must always wear clothes to them :p

Any way, my note taking has been helpful as I have a system thats very organised so I can quickly find a bit that I wanted to remember how to do but I have now decided to dumb down my notes so I can be quicker at it but with the main bits still there. That way I can spend more time on my assignments. I was just trying to do what I did for my CAD lessons, my notebook for that was amazing, people were always asking to borrow it; think I even made copies for my friends who were struggling too. Always made me smile when I saw people looking up how to do something in my notes. Maybe one day I will type all my notes up and make it into a book along with tips I learn about animating during my life. Wish I could of done that with CAD notes but they mysteriously vanished :(

Monday, 25 July 2011

2nd Springboard Assignment!

This week is split into 2 sessions. I wasn't expecting that but its fine :)
The first session is about modelling and teaching us how to do it so we can make a basic character. I'm actually really enjoying messing with it to make a character that appeals to me. I've never really gone into modelling with Maya before so learning new things. My fellow classmates have set a challenge too. To see who can make the cutest character, my original plan has now changed slightly... I love challenges!

The 2nd session is to build a set for my character and place 2 or 3 cameras in different angles. Then put my character in the scene. I reckon this part will be quite simple as I already know what it discussed in this tutorial but should still be fun.

When I've finished it I will post a few images to see what you think and so you can see what I came up with.

Oh and also found out something... We don't get grades in Springboard! Gutted but not going to stop me doing my best :D

Also, here is a picture of me brought up on webcam during our Q&A :) They are so enjoyable and fun I can't help but grin!

Monday, 18 July 2011

Finally got my first lecture video!

Woohoo! It all began this week and I've been taking my time to make sure I get it all right. I really do want to do my best.

Any way, our first lecture video was full of stuff! Below is what was discussed in it.
  • Simplifying workspace, short cuts
  • Basic UI elements
  • Preferences: Undo = infinite
  • Tracking and Zooming in the different views
  • NURBS definition
  • NURBS Primitives: Sphere, Cylinder, Torus, Cone
  • Basic interaction tools: Select (q), Move (w), Rotate (e), Scale (r)
  • Panel display options: 1/2/3, wireframe (4), shaded (5), textures (6), lights (7)
  • Marking Menu: what the heck?
  • Channel Box: Translate, Rotate, Scale
  • Outliner: part 1
  • Saving versions - .ma vs. .mb: Always save as .ma
  • Using the integration “Help” feature in Maya for tutorials, reference, etc.
  • Character / Tools section: downloading and opening .zip files
  • How to make a .zip file for upload
  • Submit your work (Assignment Sessions)

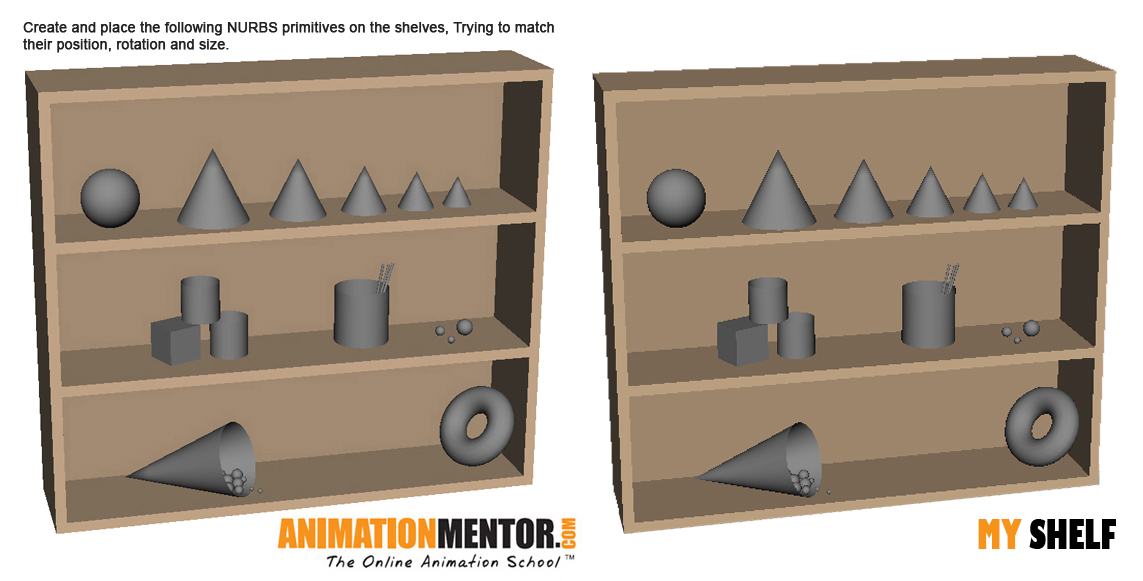
From what we were taught in the lecture we were given an assignment. This was to create a series of NURBS and transforming them to match an image we were given. Then save it as a zip file and upload it. I took my time with this assignment as I wanted it to be perfect or as close as I could get any way. (Some of my perfectionist habit coming through). I took Screen Shots as I made each NURBS object so I can show you how I did it and where I started but firstly here is the image we were given and my final version.


Here are my progress shots with some close ups and even when I used a camera to check that balls weren't going through the cone or other balls.


To do this assignment I actually came up with an idea. I downloaded an app called 'Afloat'. It basically allows you to make some software transparent so I made the image we were given transparent and then placed it over maya and then adjusted each object to fit over the image. I also just put the image over the top normally and kept minimising and opening it over maya to check it looked right but it was a huge help in making it as exact as possible. I did of course make sure through other views that they were sat on the shelf and not going through other objects though.

Tuesday, 12 July 2011

1 Week to go!

I've been put through another 3 weeks of orientation and it was killing me as I am really excited about it but as I've been kept so busy for most of that time its distracted me from the waiting! I have heard from my mentor though! His name is Said Abdul Ghafoor and his website is www.saeedag.com I have also found out that my Q&As are Tuesdays and Thursdays at 6pm GMT (10am PST) and that my first lecture is next week.
I'm actually really nervous now but I'm sure I'll be fine and its just my excitement. I want to work harder than I have ever worked before, I want to be one of the best and most committed students Animation Mentor has ever had and I will blog what I do as soon as I've done it.

Please give feedback on my work; good or bad... don't worry about what you'll say, I can take it and I'd rather know if anything looks wrong or could be better so I can learn but please give a reason, don't just say 'its rubbish', please say 'its rubbish because...' or something along those lines. I'd really appreciate it :)

Been busy but kept me distracted

Apologies for not posting for ages. It was my uni bike clubs rally and as I've been in London I had been kept in the dark about the organising but with 2 weeks to go I found out that they had no bands booked! So I quickly searched for bands and luckily next day I found 'Storm' and then a mate pulled through and found the other a few days later... talk about cutting it fine. The rally did go brilliantly although I was pretty exhausted after it, I did enjoy it.

I marshalled from 11am on Friday until 1am Saturday then got woken with a start at 8.30am by someone sneaking their hand in my tent and pulling my ankle so I slid across my airbed, think I yelled "Ahhh! Somethings got me!" Really scared me at the time and for some reason my first thought was an animal. Any way, that got me up and I marshalled again until 9am on Sunday, watching the sunrise in-front of a huge bonfire, the bands, the entertainment and seeing everyone enjoying themselves made up for it though. I did get an hours nap at 9am on Sunday too but it was scorching in the tent an hour later so I woke up and I was surprised again but this time because I was surrounded by balloons and a space hopper! Must of been over 50 balloons in my tent, was very colourful but surprising to wake up to. Wish I'd taken a photo now.

After all that I'm still not home as I went to visit my mum and saw she was very stressed because she had run a deal with Groupon and couldn't cope with all the bookings and phone calls so I decided to help her by answering the phone and taking bookings and card payments. Been doing that for nearly 2 weeks now and seems a bit silly going back to London when I'm meant to be going to Red Bull's Flugtag in Roundhay Park, Leeds this weekend and then a welcome back party in Sheffield for my friend who's been travelling for about 6 months. I do miss having a bed and my own space though, my drawing suffers when I'm at my mums as I have many siblings and its busy all the time. Good thing I have a good laptop and my mum and boyfriend have good internet or I'd be spending a lot of time in coffee shops for my springboard course. Although coffee shops would be more relaxing... mmm will have rethink my plan.

UPDATE
I went to the Red Bull Flugtag in Leeds. I loved it although it was really slow and I think poorly arranged in some areas, it also rained so I got really muddy and wet but it was just so interesting and I was always curious how each team would do and what performance they would do. Oh and something awesome! One of the teams was called To Infinity and the Pond and they had come as characters of Toy Story and their craft was Buzz's wings and RC! Below is a picture I took of them and one I found on the internet. Even better... they won! Got tons of points for creativity and performance, didn't fly that far though, was only a few feet. Silly way of doing it in my opinion as I think the distance should be more important but still entertaining.