I heard back from the Career Development Loan and they said that they have denied me it so I called them and they said its because on the statements I sent I had once gone overdrawn by £2 and received a £25 bank charge but if I applied again once it is off my statements the would be no problem in receiving it but that means waiting another 2 & 1/2 months. I'm totally gutted about it and was angry at first because the thing that made me go overdrawn wasn't meant to go out that day and its such a small amount. After that I was depressed for quite a while, hence my silence on here recently. But I am going to do what they suggested as learning is important to me.
You may ask why tell you this but I figured that if anyone else is thinking of applying they can avoid the pain I've been through because you know you will fail if you any bank charges on your statement. I am also now applying for an account with Barclays so it will be quicker and easier to apply as they can tell you over the phone there and then if you are accepted or not.
I still want to be on the Winter term though so I asked Victoria for an extension for the payment date and I am allowed till December 16th. I'm selling what I can to fund the first term and hopefully I'll hear back from the AM loans adviser, Amiko to see if they have any other ideas as to how I can raise the funds for it.
Wednesday 30 November 2011
Cool! Another Simon's Cat drawing video!
I am a fan of Simon's Cat on Facebook and it was announced that a new video had been added for drawing the new kitten character! Its just as good and interesting also. I'm amazed that he can draw them so quickly but I guess he has had a lot of practice. Proof that practice makes perfect.
Wednesday 23 November 2011
How to draw Simon's Cat!
Everyone who knows me knows that I love Simon's Cat from the style to the humour but last week Simon Tofield the creator and animator of it made the below video. It shows how he draws Simon's Cat and I found it fascinating to watch and how he always uses the same method of drawing him. Start with the eyes, then the nose and mouth.etc. Have a watch and you'll see what I mean :)
The is also a video of the Kitten Chaos Premiere which sadly I didn't win tickets to but I can imagine would of been an amazing experience but at least I got a glimpse of it from this video.
The is also a video of the Kitten Chaos Premiere which sadly I didn't win tickets to but I can imagine would of been an amazing experience but at least I got a glimpse of it from this video.
Thursday 10 November 2011
Principles of animating a Bouncing Ball - 4
In-betweens
The last step is to do the in-betweens. In-betweens are the drawings/frames between the key frames which help to create the illusion of motion.

The last step is to do the in-betweens. In-betweens are the drawings/frames between the key frames which help to create the illusion of motion.
When doing the in-betweens using traditional animation you need to remember to transform the ball from its round shape to move of an oval shape but using 3D such as Maya it will do the in-betweens for you but you will need to use the graph editor to make sure the ease-in and ease-outs work and that the ball is stretching along the arc and that the transitions work. Your ball bounce with in-betweens should look a bit like my drawing below on the right.

The best way to work out your animation is to PLAN! You will hear this over and over again but planning is very important. It may seem at the time like you know what you want and can skip it but trust me when it comes to it you will end up animating and reanimating until you end up doing the planning any way.
Below is the ball bounce that I made in Flash to show what the final thing should be like. Sorry that its poor quality. Something that happens in the uploading to blogspot I think.
Tuesday 1 November 2011
Principles of animating a Bouncing Ball - 3
Squash and Stretch
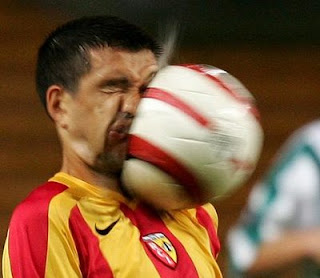 Now onto something you hear a lot about in animation - Squash and Stretch. You also see it in the real world (a funny picture of this is shown on left). Actually the starting place of learning about it for all animators is with a bouncing ball. A basic explanation of it is that the ball is round at the top of an arc and as it travels it stretches as it speeds up and when it contacts the floor in squashes and as it bounces back up the next arc it stretches again and then back round and the cycle continues until the ball comes to a stop.
 To start doing this use Key Poses; for our bounce it is going to be when the ball is a circle and when it squashes on the floor as you can see in my drawing on the left. This is all done to give the ball weight and is very important but you must make sure you keep the same volume area when squashed as it is round.
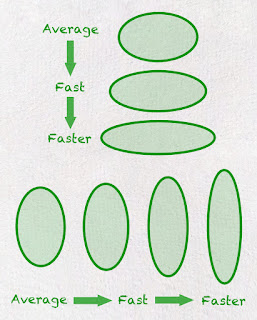 The speed the ball is going also depends on the amount of squash you have; in other words the faster it's travelling the more squashed and stretched it will be. I made the image on the right to explain this with squash on top and stretch below.
Next up you need to add the stretches which are the main breakdown drawings/poses, in a sense they are really in-between drawings that explain the action the ball is making. In-betweens are the poses that are between the Key Poses. Below is an update of the image I made with the Break Downs added in yellow.
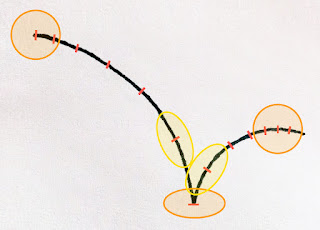 As you can see, the marks we have used so far have all been in the centre of the poses so you can now see how they came in handy ;)
Any way, back to stretch; unlike with squash that mainly shows weight, stretch shows the speed a ball is moving although you do also need to take in its weight.
A great blog that has some posts on Squash and Stretch is HERE. It has some great examples and really explains what it is and its principles so if you want to know more I strongly recommend visiting it.
Now onto something you hear a lot about in animation - Squash and Stretch. You also see it in the real world (a funny picture of this is shown on left). Actually the starting place of learning about it for all animators is with a bouncing ball. A basic explanation of it is that the ball is round at the top of an arc and as it travels it stretches as it speeds up and when it contacts the floor in squashes and as it bounces back up the next arc it stretches again and then back round and the cycle continues until the ball comes to a stop. To start doing this use Key Poses; for our bounce it is going to be when the ball is a circle and when it squashes on the floor as you can see in my drawing on the left. This is all done to give the ball weight and is very important but you must make sure you keep the same volume area when squashed as it is round.
 The speed the ball is going also depends on the amount of squash you have; in other words the faster it's travelling the more squashed and stretched it will be. I made the image on the right to explain this with squash on top and stretch below.
Next up you need to add the stretches which are the main breakdown drawings/poses, in a sense they are really in-between drawings that explain the action the ball is making. In-betweens are the poses that are between the Key Poses. Below is an update of the image I made with the Break Downs added in yellow.
 As you can see, the marks we have used so far have all been in the centre of the poses so you can now see how they came in handy ;)
Any way, back to stretch; unlike with squash that mainly shows weight, stretch shows the speed a ball is moving although you do also need to take in its weight.
A great blog that has some posts on Squash and Stretch is HERE. It has some great examples and really explains what it is and its principles so if you want to know more I strongly recommend visiting it.
Principles of animating a Bouncing Ball - 2
Slow-In and Slow-Out
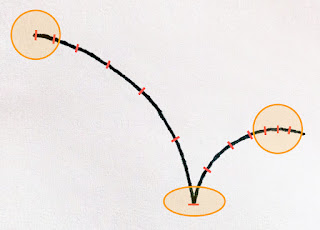
The next principle of animating a bouncing ball is Slow-In and Slow-Out. This is the action the ball takes on the Path of Action. In the case of the ball, the beginning of the arc is called Slow-In and after the ball does its bounce it goes into Slow-Out, this is because it loses some of its momentum so slows as it approaches the top.
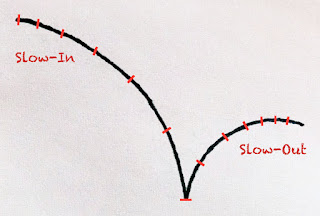 A great tip I was recommended to do when planning your Slow-In and Slow-Out is to put marks along the arc so you can easily work out the balls position and timing. For Slow-In you want the marks to be quite close together and gradually have more space in-between and then the opposite of this for your Slow-Out. Here you can see I've added some marks to my drawing to explain this.
REMEMBER - The closer together the marks are the slower it will move!